Today's card is very quick and easy to create. Whether you are new to stamping or an avid stamper with limited time and need a card in a hurry, this card is perfect for any crafter.
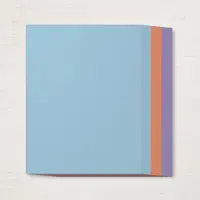
- Cut a piece of Whisper White cardstock to 5 1/2" x 4 1/4" for the card base and score it down the middle using the Stampin' Trimmer.
- Cut a piece of Botanical Butterfly Designer Series Paper (FREE during Sale-A-Bration with $50 purchase. Click HERE for more details) to 5 1/4" x 4" using the Stampin' Trimmer for the matting.
- Using the flip side of this print, cut out a piece of polkadot paper large enough to mat the sentiment.
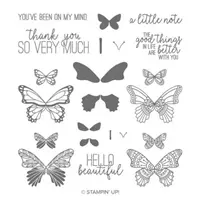
- Stamp a sentiment on a piece of Whisper White cardstock. I used a "Thank You" stamp from a past Paper Pumpkin kit called Hello Sunshine. Click HERE for more information on monthly Paper Pumpkin kits.
- Cut a 20" piece of Highland Heather Organdy Ribbon (FREE during Sale-A-Bration with $50 purchase. Click HERE for more details).
- Now it's time to assemble your card. Wrap the Highland Organdy Ribbon around the matting, tying a bow in the front (you may run a small piece of Snail Adhesive to the back of the matting to hold the ribbon in place).
- Adhere the layers to the card base using either Snail Adhesive or Multipurpose Liquid glue. I used Stampin' Dimensionals to pop up the sentiment and backing to give it dimension.
Below are the products that I used. You may click on any photo to enlarge it and see the details.


Wow!! Get an extra FREE stamp set in the March Paper Pumpkin kit!!

Subscribe now to be sure to receive your March kit: https://bit.ly/2WWyoyE
OR
Try it for a month, buy your 1 month subscription here: https://bit.ly/2N1iCh7
Paper Pumpkin is the perfect way to jump into the world of paper crafting and get your creative “me-time” every month. Included are all the stamps, ink, and paper you need to create a fun project, without any stress. Everything is precut and ready to go so you can skip to the fun part of crafting! Subscribers always have cards and cute gifts on hand for every occasion. Your first kit includes a free clear stamping block. You’ll also build a collection of stamps and ink to use on other projects. There’s no pressure—you can cancel or suspend at any time. Subscribe by the 10th of the month to get started!
Don't forget to use this month's Hostess Code: RJFDFVEW to receive your FREE gift.
Click HERE for details on the Host Code.
Until next time, Happy Stampin!
- Shop My Online Store HERE
- My Blog: www.borntoscrapbook.blogspot.com
- February Hostess Reward Code: RJFDFVEW
- Click HERE for Host Code details.
- Check out the Clearance Rack to save up to 70%.
- Save 10% on Coordinating Product Bundles
- Click HERE to subscribe to Paper Pumpkin.
- Click HERE to join my team.
Laura Morris